
#인터셉터(Interceptor)
인터셉터는 컨트롤러가 동작하기 전에 사용자가 정의하는 행동을 하는 것을 의미 합니다.
nestjs에서 인터셉터를 만드는 것은 어렵지 않습니다.
NestInterceptor 라는 인터페이스를 상속받은 뒤에 @Injectable 데코레이터를 붙여주면 기본적인 인터셉터 모양을 만들 수 있습니다.
* 파일이름 : app.일반인터셉터.ts
import {
  Injectable,
  NestInterceptor,
  ExecutionContext,
  CallHandler,
} from '@nestjs/common';
import { Observable } from 'rxjs';
import { tap } from 'rxjs/operators';

@Injectable()
export class 일반인터셉터 implements NestInterceptor {
  intercept(context: ExecutionContext, next: CallHandler): Observable<any> {
    console.log('메소드 단위 인터셉터 동작');
    return next
      .handle()
      .pipe(tap(() => console.log(`메소드 단위 인터셉터 실행 후`)));
  }
}
간혹 보게되는 pipe라는 함수는 구독가능한 객체의 함수에 새로운 기능을 붙일 때 사용됩니다.
원래의 기능은 유지하되, 내가 무언가 덧붙여서 행동을 하고싶을 때 사용하는 것으로 생각하면 될 거 같습니다.
Nestjs를 접하다 보면 pipe, Observable, take 및 subscribe 같은 내용이 자주나오게 됩니다.
그러므로 Nestjs를 좀더 익숙하게 다루기 위해서는 rxjs에 대해서 공부가 필요할 거 같습니다.
이렇게 만들어진 인터셉터를 사용하기 위해서는 역시나 모듈에 추가하여주어야 합니다.
* 파일이름 : app.module.ts
import { Module } from '@nestjs/common';
import { AppController } from './app.controller';
import { 다른컨트롤러 } from './app.다른컨트롤러';
import { AppService } from './app.service';
import { 디비모듈Module } from './디비모듈/디비모듈.module';
import { 일반인터셉터 } from './app.일반인터셉터';

@Module({
  imports: [디비모듈Module],
  controllers: [AppController, 다른컨트롤러],
  providers: [AppService, 일반인터셉터],
})
export class AppModule {}
이를 사용해야되는 클래스에 아래처럼 붙여줄 수 있습니다.
* 파일이름 : app.controller.ts
import { Request, Response } from 'express';
import {
  //생략....
  UseInterceptors
} from '@nestjs/common';
import { 일반인터셉터 } from './app.일반인터셉터';

@Controller()
export class AppController {

  //생략....

  @UseInterceptors(일반인터셉터)
  @Get() //get방식 요청에 응답 합니다. 값이 비어있으면 기본 루트를 의미 합니다.
  getHello(): string {
    return this.appService.getHello();
  }

  //생략....
}
이제 해당 인터셉터는 일반요청의 get방식에서 동작하게 됩니다.

재미있게도 인터셉터는 모듈단위로 동작하게 할 수 있으며 또한 앱 전체가 동작하게도 적용할 수 있습니다.
위에 설명한 방법은 클래스의 메서드단위의 동작방법입니다.
세부적으로 동작이 필요한 경우에는 위 방법을 사용합니다.
아래는 모듈에 적용한 버전 입니다.
모듈에 적용할 인터셉터를 만들어 줍니다.
* 파일이름 : app.모듈인터셉터.ts
import {
  Injectable,
  NestInterceptor,
  ExecutionContext,
  CallHandler,
} from '@nestjs/common';
import { Observable } from 'rxjs';
import { tap } from 'rxjs/operators';

@Injectable()
export class 모듈인터셉터 implements NestInterceptor {
  intercept(context: ExecutionContext, next: CallHandler): Observable<any> {
    console.log('모듈인터셉터 동작 ');
    return next.handle().pipe(tap(() => console.log(`모듈인터셉터 실행 후`)));
  }
}
만들어진 인터셉터를 역시나 모듈에 추가하여 줍니다.
* 파일이름 : app.module.ts
import { Module } from '@nestjs/common';
import { AppController } from './app.controller';
import { 다른컨트롤러 } from './app.다른컨트롤러';
import { AppService } from './app.service';
import { 디비모듈Module } from './디비모듈/디비모듈.module';
import { 일반인터셉터 } from './app.일반인터셉터';

//모듈인터셉터 설정--
import { 모듈인터셉터 } from './app.모듈인터셉터';
import { APP_INTERCEPTOR } from '@nestjs/core';

@Module({
  imports: [디비모듈Module],
  controllers: [AppController, 다른컨트롤러],
  providers: [AppService, 일반인터셉터,{ provide: APP_INTERCEPTOR, useClass: 모듈인터셉터 }],
})
export class AppModule {}
기존에 providers에는 단순하게 배열형태로 데이터를 등록(주입)하였다면 이번에는 provide와 useClass라는 속성을 추가한 모습을 볼 수 있습니다.
모듈 데코레이터에서의 providers가 받을수 있는 데이터 형식은 이처럼 다양합니다.
인터셉터가 동작하는 순서는 아래와 같습니다.
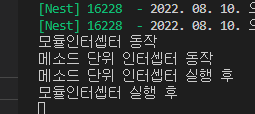
모듈에 적용된 인터셉터가 가장 처음 동작하고, 이후에 클래스에 적용된 인터셉터가 시작 / 종료하게 됩니다.
클래스에 적용된 인터셉터가 종료하면 이제 모듈에 적용된 인터셉터가 종료하게 됩니다.
마지막으로 이번엔 앱 전체에 인터셉터를 적용하는 방법 입니다.
모든 모듈에도 인터셉터가 동작하게 하려면 부트스트랩에 가장먼저 사용되는 메인파일을 수정해야 합니다.
먼저 모든(글로벌) 모듈에서 동작하게 하는 인터셉터를 추가합니다.
* 파일이름 : app.글로벌인터셉터.ts
import {
  Injectable,
  NestInterceptor,
  ExecutionContext,
  CallHandler,
} from '@nestjs/common';
import { Observable } from 'rxjs';
import { tap } from 'rxjs/operators';

@Injectable()
export class 글로벌인터셉터 implements NestInterceptor {
  intercept(context: ExecutionContext, next: CallHandler): Observable<any> {
    console.log('글로벌인터셉터 동작 ');
    /*
    const { method, url } = context.getArgByIndex(0);
    const http = context.switchToHttp();
    const request = http.getRequest();
    //파라미터를 받아서 사용하는 방법
    console.log(
      `글로벌 인터셉터 : ${method} ${url} body(post 방식) : ${JSON.stringify(
        request.body,
      )}  query(get 방식) : ${JSON.stringify(request.query)} `,
    );
     */
    return next.handle().pipe(tap(() => console.log(`글로벌인터셉터 실행 후`)));
  }
}
주석을 통해 사용자의 요청한 파라미터를 사용하는 방법을 추가하였습니다.
이렇게 만들어진 인터셉터를 이제 메인파일에 추가하여 줍니다.
* 파일이름 : main.ts
import { NestFactory } from '@nestjs/core';
import { NestExpressApplication } from '@nestjs/platform-express';
import { AppModule } from './app.module';
import { 에러필터 } from './에러필터';
import { Http에러필터 } from './Http에러필터';
import { 글로벌인터셉터 } from './app.글로벌인터셉터';

async function bootstrap() {
  const app = await NestFactory.create<NestExpressApplication>(AppModule); //NestExpressApplication
  app.useGlobalInterceptors(new 글로벌인터셉터());
  app.useGlobalFilters(new 에러필터(), new Http에러필터());
  await app.listen(3000);
}
bootstrap();
새로이 실행을 해 보면 재미있는 장면을 볼 수 있습니다.
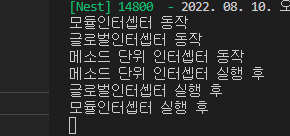
당연히 모든(글로벌) 모듈에 동작 하도록 만든 인터셉터가 동작할 줄 알았는데..
모듈이 먼저동작하고, 그 다음으로 메인파일에 있는 인터셉터가 마지막으로는 클래스에 있는 인터셉터가 동작하는 것을 볼 수 있습니다.
* 시작 순서 : 모듈 > 글로벌 > 클래스(메서드)
* 종료 순서 : 클래스(메서드) > 글로벌 > 모듈
인터셉터, 필터의 동작 우선순의를 이렇게 알아가는 것도 좋지만 역시나 공식문서를 통해 이해하는 것이 좋을 것 같습니다.
https://docs.nestjs.com/faq/request-lifecycle
Documentation | NestJS - A progressive Node.js framework
Nest is a framework for building efficient, scalable Node.js server-side applications. It uses progressive JavaScript, is built with TypeScript and combines elements of OOP (Object Oriented Progamming), FP (Functional Programming), and FRP (Functional Reac
docs.nestjs.com
위 내용에 사용된 소스코드는 아래 제 깃허브에서 받아서 확인할 수 있습니다.
https://github.com/TaeSeungRyu/NestProject/tree/main/step5
GitHub - TaeSeungRyu/NestProject: Nestjs 프로젝트
Nestjs 프로젝트. Contribute to TaeSeungRyu/NestProject development by creating an account on GitHub.
github.com
공부하면 할 수록 재미있고 즐거운 nestjs!!!
다음 포스팅에서는 가드와 관련된 내용을 정리 해 보겠습니다!
궁금한점 또는 틀린부분은 언제든 연락 주세요!
'Node.js > Nestjs (Nest.js)' 카테고리의 다른 글
| Nestjs 프레임워크 서버(세션) -8 (0) | 2022.08.19 |
|---|---|
| Nestjs 프레임워크 서버(가드와 오류 필터) -7 (0) | 2022.08.12 |
| Nestjs 프레임워크 서버(객체 매핑과 파일 업로드) -5 (0) | 2022.07.05 |
| Nestjs 프레임워크 서버(루트 모듈, 다른 모듈) -4 (0) | 2022.07.04 |
| Nestjs 프레임워크 서버(컨트롤러와 모듈) -3 (0) | 2022.06.30 |


댓글