
Spring webflux와 관련된 일반적인 설명, 소개 및 배경은 구글링을 하면 잘 나온다.
무슨 반응형 프로그래밍..함수형 프로그래밍 등등 여러 내용이 나오는데..
머리보다 몸이 먼저인 사람에게는 참 어렵고 쉽지않는 내용이다.
아무튼, 요놈의 웹플럭스는 Spring5 부터 사용 가능한 최근에 나온 프레임워크이며 Java8에서 나온 각종 함수형 코딩방법, rxjava같은 반응형 방법등을 사용하여.....
동작 원리가 이해하기 어렵다면 기능구현을 먼저 해 보고나서 뒤돌아가 원리를 찾아보는 것도 나쁘지 않다고 생각한다.
아무튼, 웹플럭스를 사용하려면 가능한 STS 툴을 사용해서 하도록하자.
여기서는 STS를 사용하였다. (버전 : 4.2.0)
먼저 스프링부트 프로젝트를 만들어준다.

프로젝트를 만들고 난 뒤에 웹플럭스에 필요한 라이브러리를 추가한다.
* 기존 라이브러리는 전부 제거합니다!!
* 또한 스프링 부트에서 기본으로 만들어주는 ServlceServletInitializer 클래스도 제거합니다!
-> SpringBootServletInitializer 클래스를 상속받는 클래스 입니다.
-> 메인 메소드를 포함하지 않는 configure 메소드를 오버라이드 한 클래스를 의미 합니다.
* 메이븐
		<dependency>
			<groupId>org.springframework.boot</groupId>
			<artifactId>spring-boot-starter-webflux</artifactId>
		</dependency>
* Gradle
// https://mvnrepository.com/artifact/org.springframework.boot/spring-boot-starter-webflux
compile group: 'org.springframework.boot', name: 'spring-boot-starter-webflux', version: '2.2.5.RELEASE'
프로젝트가 생성되면 메인메소드는 그냥 그대로 두면 된다.
메인메소드가 존재하는 클래스를 제외하고 나머지 클래스는 삭제하자.
웹플럭스에서 주로 만나게될 녀석은 바로 RouterFunction 라는 인터페이스이다.
사용자의 요청에 대한 처리 절차를 함수형 방법으로 나열했다고 생각하면 될 것 같다.
첫번째로 일반 요청에 따라 Json형식으로 응답하는 기능을 만들어보자.
import java.util.HashMap;


import org.springframework.http.MediaType;
import org.springframework.stereotype.Component;
import org.springframework.web.reactive.function.BodyInserters;
import org.springframework.web.reactive.function.server.ServerRequest;
import org.springframework.web.reactive.function.server.ServerResponse;

import reactor.core.publisher.Mono;

@Component
public class FirstHandler {

    private HashMap<Object, Object> result = new HashMap<>();
    private Mono<HashMap<Object, Object>> mapper = Mono.just(result);

    public Mono<ServerResponse> hello(ServerRequest request) {
        result.put("number", 1234);
        result.put("text", "webFlux");
        mapper.subscribe( (arg)->{//구독..?
            System.out.println(arg);
        });
        return ServerResponse.ok().contentType(MediaType.APPLICATION_JSON).body(BodyInserters.fromProducer(mapper, HashMap.class));
    }
}
FirstHandler라는 클래스를 추가하였다.
컴포넌트 에노테이션을 붙여서 빈객체로 등록해 주었다.
뭔지는 잘 모르겠지만 Mono 라는 클래스를 리턴하는 hello 라는 메소드를 포함하고 있다.
메소드 내용은 짐작하긴 어렵지만 왠지 저 HashMap을 사용자의 요청이 존재하면 Json형태로 전달 할 것만 같다.
위 클래스는 MVC패턴으로 비교하면 Service의 역할을 하게 될 것 이다.
이제 사용자의 요청에 대한 응답에 대한 클래스를 만들어보자.
import org.springframework.context.annotation.Configuration;


import org.springframework.context.annotation.Bean;
import org.springframework.http.MediaType;
import org.springframework.web.reactive.function.server.RequestPredicates;
import org.springframework.web.reactive.function.server.RouterFunction;
import org.springframework.web.reactive.function.server.RouterFunctions;
import org.springframework.web.reactive.function.server.ServerResponse;


@Configuration
public class RoutsConfig {

    @Bean
    public RouterFunction<ServerResponse> route(FirstHandler handler) {
        return RouterFunctions.route(
            RequestPredicates.GET("/hello").and(RequestPredicates.accept(MediaType.TEXT_PLAIN)), handler::hello);
    }

}
방금 위에서 만든 FirstHandler라는 클래스를 RouterFunctions 인터페이스에 넣어 전달하였다.
GET이라는 메소드가 왠지 GET방식의 hello라는 요청에 대해서 동작 할 것 같고...
FirstHandler의 클래스의 내용이 실행될 것 같다.
사실 보는내용 그대로가 전부이다. GET을 통해서 get방식요청 hello에 대해서 응답하고,
뭔지는 모르겠지만 FirstHandler의 hello메소드를 리턴해주는 것이 전부이다.
위 클래스는 MVC 패턴으로 비교한다면 Controller 의 역할을 담당하게 될 것 이다.
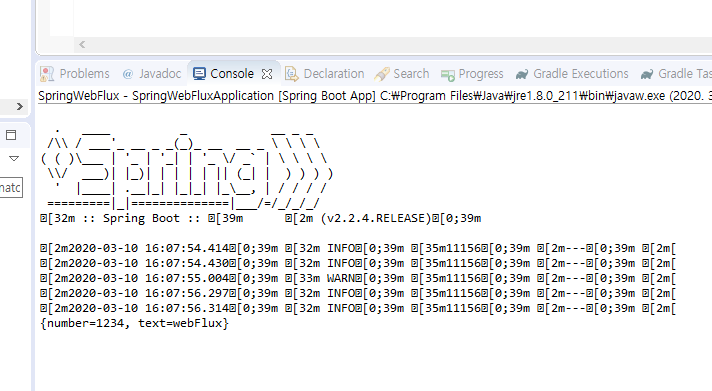
그러면 한번 실행하여보자!!

그리고 sts의 콘솔창도 살펴보자.
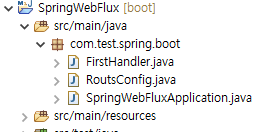
여기까지의 프로젝트 구조는 아래사진처럼 되어있다.
여기까지 동작이 완료되었다면 우리가 알 수 있는 것은,
RoutsConfig클래스가 컨트롤러의 역할과 비슷한 행동을 하고, FirstHandler 클래스가 마치 서비스의 역할을 하는 것 같다라는 점 이다.
대부분의 샘플 코드나 예제가 구글링하면 json 방식으로 데이터를 리턴하는 것만 나와있다.
그러면 이제 웹페이지를 띄워보자.
applictaion.properties에서 아래 세팅을 하여보았다.
spring.mvc.view.prefix=classpath:/resources/static/
spring.mvc.view.suffix=.html
그리고 화면을 띄웠는데..
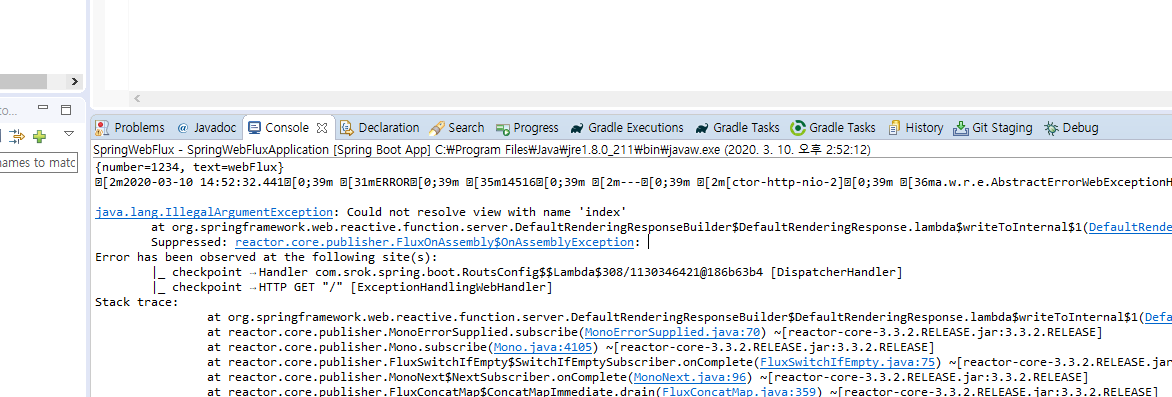
프로퍼티를 요리조리 바꾸어보았지만 뭐 되는게 없었다.
사실, 웹플럭스는 뷰 리졸버가 자동으로 등록되지 않기 때문에 뷰 리졸버에 대해서는 따로 세팅을 해 주어야 한다.
권장하는 방법이 뷰와 관련되서는 프레임워크를 추가하여 사용하라고 되어 있다.
여기서는 thymeleaf라는 프레임워크를 사용 하였다.
* 메이븐
    <dependency>
        <groupId>org.thymeleaf</groupId>
        <artifactId>thymeleaf-spring5</artifactId>
    </dependency>
* Gradle
// https://mvnrepository.com/artifact/org.thymeleaf/thymeleaf-spring5
compile group: 'org.thymeleaf', name: 'thymeleaf-spring5', version: '3.0.11.RELEASE'
RoutsConfig 클래스에 뷰와 관련된 내용을 수정하여보자.
import org.springframework.context.annotation.Configuration;

import org.springframework.context.ApplicationContext;
import org.thymeleaf.spring5.ISpringWebFluxTemplateEngine;
import org.thymeleaf.spring5.SpringWebFluxTemplateEngine;
import org.thymeleaf.spring5.templateresolver.SpringResourceTemplateResolver;
import org.thymeleaf.spring5.view.reactive.ThymeleafReactiveViewResolver;
import org.thymeleaf.templatemode.TemplateMode;
import org.thymeleaf.templateresolver.ITemplateResolver;
import org.springframework.web.reactive.config.ViewResolverRegistry;
import org.springframework.web.reactive.config.WebFluxConfigurer;
import java.util.HashMap;
import org.springframework.context.ApplicationContextAware;
import org.springframework.beans.BeansException;

import org.springframework.context.annotation.Bean;
import org.springframework.http.MediaType;
import org.springframework.web.reactive.function.server.RequestPredicates;
import org.springframework.web.reactive.function.server.RouterFunction;
import org.springframework.web.reactive.function.server.RouterFunctions;
import org.springframework.web.reactive.function.server.ServerResponse;


@Configuration
public class RoutsConfig implements ApplicationContextAware, WebFluxConfigurer {

    ApplicationContext context;

    @Bean
    public RouterFunction<ServerResponse> route(FirstHandler handler) {
        return RouterFunctions.route(
            RequestPredicates.GET("/hello").and(RequestPredicates.accept(MediaType.TEXT_PLAIN)), handler::hello);
    }

    @Bean
    public RouterFunction<ServerResponse> index() {  // /요청에 대한 페이지 정의
        return RouterFunctions.route(RequestPredicates.GET("/").and(RequestPredicates.accept(MediaType.TEXT_HTML)),
                req -> ServerResponse.ok().render("index", new HashMap<Object, Object>()));
    }

    @Bean
    public ITemplateResolver thymeleafTemplateResolver() {
        final SpringResourceTemplateResolver resolver = new SpringResourceTemplateResolver();
        resolver.setApplicationContext(this.context);
        resolver.setPrefix("classpath:static/");
        resolver.setSuffix(".html");
        resolver.setTemplateMode(TemplateMode.HTML);
        resolver.setCacheable(false);
        resolver.setCheckExistence(false);
        return resolver;
    }

    @Bean
    public ISpringWebFluxTemplateEngine thymeleafTemplateEngine() {
        SpringWebFluxTemplateEngine templateEngine = new SpringWebFluxTemplateEngine();
        templateEngine.setTemplateResolver(thymeleafTemplateResolver());
        return templateEngine;
    }

    @Bean
    public ThymeleafReactiveViewResolver thymeleafReactiveViewResolver() {
        ThymeleafReactiveViewResolver viewResolver = new ThymeleafReactiveViewResolver();
        viewResolver.setTemplateEngine(thymeleafTemplateEngine());
        return viewResolver;
    }


    @Override
    public void configureViewResolvers(ViewResolverRegistry registry) {
        registry.viewResolver(thymeleafReactiveViewResolver());
    }

    @Override
    public void setApplicationContext(ApplicationContext applicationContext) throws BeansException {

    }

}
아니 뷰 리졸버 세팅이 이렇게도 많은 코드라인을 차지하다니..
뭐..타일즈나 다른 프레임워크를 사용하여도 상관 없다.
여기서의 핵심은 두번째 index 메소드를 살펴보자.
첫번째 매소드와 마찬가지로 함수형 방법으로 무언가 나열되어 있지만 대략 알 수 있는 것은 index라는 페이지로 이동시켜 줄 것 같다라는 점 이다.
static 디렉토리에 index.html 파일을 만들어주자.
* index.html 파일 내용
<div>hello</div>
* index.html 파일 위치

그리고나서 서버를 재 시작하고 접속하여보면,
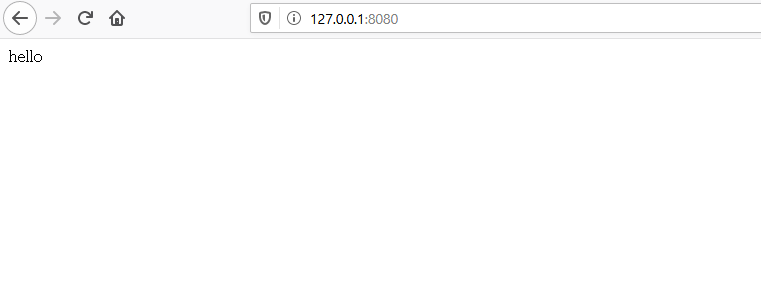
뷰 페이지가 정상적으로 나오는 것을 볼 수 있다.
정말 앞뒤 다 짜르고 단순하게 json으로 데이터를 받고, 뷰 페이지를 띄우는 것을 소개하였다.
개념이나 원리에 대해서는 다른 블로그나 포스팅이 더 나을수도 있다...ㅠ
그러면 화면도 띄웠고, json 형식의 데이터도 만나 보았으니 이제 웹플럭스가 뭔지 좀더 분석하여보자!!
아래 샘플코드를 첨부한다.
spring webflux!
* 악성코드나 바이러스 없습니다!!! >ㅁ<
* 내용을 채우고 수정중입니다.
* 튜토리얼이나 가이드 목적보다도 개념정리에 목적을 두고 쓰고있습니다. 틀린부분이나 누락된 부분은 꼭 알려주세요!
'Spring framework > Spring Webflux' 카테고리의 다른 글
| spring webflux 5 (웹플럭스 적용기, Mono와 Flux의 Processor) (0) | 2020.03.25 |
|---|---|
| spring webflux 5 (웹플럭스 적용기, Mono와 Flux 자주 보이는 map) (0) | 2020.03.20 |
| spring webflux 4 (웹플럭스 적용기, Mono와 Flux) (0) | 2020.03.18 |
| spring webflux 3 (웹플럭스 적용기, 함수형과 반응형) (2) | 2020.03.12 |
| spring webflux 2 (웹플럭스 적용기, 기본 구조) (0) | 2020.03.11 |


댓글