
* 제가 다시 작성한 최신 튜토리얼 수정본 입니다. 아래 주소를 통해서 진행하시는 것을 권장 드립니다. ^^
앵귤러 튜토리얼(Angular tutorial) - 1
안녕하세요. 앵귤러에 대해서 알아보기위해 이곳을 찾아주신 분 들께 감사의 말씀 드립니다.^^ 천천히, 초심자도 조금 더 쉽게 접근할 수 있도록 내용을 구성하여 보겠습니다. 어��
lts0606.tistory.com
전 시간에는 ts파일에 메소드와 자료형을 토대로 콘솔이 동작하는 것 까지 확인 해 보았다.
app.commponent.ts는 아직 자세히 알 수는 없지만, 웹 화면이 동작할 때 어떠한 행동을 만들어주는, 마치 Javascript의 <script></script>내부에 쓰여진 코드같은 역할을 하는 것으로 볼 수 있다.
그리고 잠깐 살펴본 app.component.html은 *.html, *.jsp, *.ejs, *.php 등등..자바스크립트 노드(예를들면 div테그, input type 테그 등등)가 포함 된 사용자가 실제 보는 화면을 구성하는 것으로 볼 수 있다.
여기까지만 놓고 본다면, 타입스크립트 기반의 앵귤러는 화면을 구성하는 코드 / 동작에 대한 정의를 하는 코드가 2가지로 구분되어 관리된다고 볼 수 있다.
조금 더 앞선 이야기지만, 이러한 app.component.ts 파일에 ajax처럼 데이터를 주고받는 행위를 추가한다면 데이터베이스에 접속하는 개념의 행동도 할 수 있는 것이다.
전시간에 만든 파일을 살펴보자.
import { Component } from '@angular/core';

@Component({
  selector: 'app-root',
  templateUrl: './app.component.html',
  styleUrls: ['./app.component.css']
})
export class AppComponent {

  title : string = 'study';  //요녀석을 주목하자
  public num : number = 10;  //요녀석도 주목하자
  public all : any = new Array();

  public printAll(arg){
    console.log(arg);
  }

  private print(arg){
    console.log(arg);
  }

  constructor() {
    var text : string = 'plain text';
    this.print(text);
    this.printAll(text);

    console.log(this.title, this.num, this.all);
  }
}
app.component.html파일을 클릭해서 전부 지우고 아래 두줄만 남겨본다.
<div>{{ title }}</div>
<div>{{ num }}</div>
개발용 서버를 구동하여 보자. 구동방법은 프로젝트 디렉토리에서 ng serve 라는 명령어를 입력하면 된다.
접속은 http://localhost:4200 이다.

이럴수가..ts파일에 쓴 내용이(변수가) 표출 되었다. app.component.ts 파일을 열어서 아래코드를 입력하여 보자.
import { Component } from '@angular/core';

@Component({
  selector: 'app-root',
  templateUrl: './app.component.html',
  styleUrls: ['./app.component.css']
})
export class AppComponent {

  title : string = 'study';
  public num : number = 10;
  public all : any = new Array();

  public printAll(arg){
    console.log(arg);
  }

  private print(arg){
    console.log(arg);
  }

  constructor() {
    var text : string = 'plain text';
    this.print(text);
    this.printAll(text);

    console.log(this.title, this.num, this.all);
  }

  private ifIwereGoToServer() : void {  //요 메소드이다.
    //어떤 특정 데이터를 주는 서버에 갔다왔다고 하자.
    //예를들어 ajax를 실행하고 나서 result값이 아래와 같은 배열이 나왔다고 가정하자.
    this.all.push('Result');
    this.all.push(12345);
    this.all.push(23456);
    this.all.push(78923);
  }
}
다음으로 app.component.html 파일을 수정하여 보자.
<div>{{ title }}</div>
<div>{{ num }}</div>
<input type='button' value='서버에 갔다왔다' (click)='ifIwereGoToServer()'/>
<br><br>
<div *ngIf="all.length > 0">
  <div *ngFor="let item of all">서버에 갔다왔다고 한 데이터 : {{item}}</div>
</div>
에..처음보는 녀석들이 추가되었다. html에서 onclick은 봤어도 (click)은 못봤는데 말이다..
(click)은 앵귤러에서 ts파일에 존재하는 메소드 등을 실행 할 때 사용되는 의미이다.
즉, 내가 만든 함수를 클릭해서 실행하고 싶을때 위 처럼 써주면 된다.
여기까지는 직관적이라 사실 어렵지 않는데..
*ngIf랑 *ngFor는 뭐란말인가;; 대충 느낌적으로는 뭔가 if는 조건문인거 같고, for는 반복문인거 같은데 말이다.
여기서는 일단 우리가 app.component.ts에서 선언한 all이라는 변수를 출력하기 위한 용도로만 이해하자.
버튼을 누르면 빈 화면에서 갑자기 내용이 나타난다.

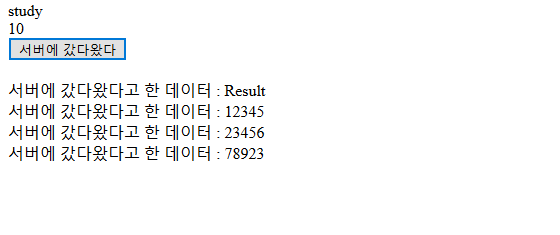
버튼을 계속 누르면 계속 내용이 추가됨을 알 수 있다.
우리가 확인해보아야 할 것은 ifIwereGoToServer() 함수이다.
해당 함수는 어떤 서버에서 데이터를 가져왔다고 가정한 메소드인데, 코드를 보면 데이터를 push하고 있다. *Javascript에서 배열에 push하는 기능과 똑같다.
맨 처음에 push를 하는 대상인 all 이라는 변수는 아무런 값을 가지고 있지 않다.
단지 public all : any = new Array(); 로 새로 만들었을 뿐이였다.
ifIwereGoToServer() 메소드가 실행되면 push를 통해서 데이터를 넣어준 것 뿐인데 신기하게도 화면에 넣은 데이터가 생겼다.
app.component.html 파일에서 아직은 알 수 없는 *ngif와 *ngfor 라는 녀석이 all 이라는 변수에 데이터가 들어오자마자 화면에 테그가 추가된 것을 알 수 있다.
그렇다면 이렇게 생각 할 수 있다.
app.component.ts파일에서 데이터를 받아오면 미리 코딩한 *ngIf나 *ngFor가 해당 데이터가 없으면 아무행동도 안하고 있다가 데이터가 추가되면 화면에 표출해 주는 것이다 라고 말이다.
사실, 위 내용은 전문용어로는 "양방향 바인딩" 이라 불리우는데...그냥 app.component.ts에서 선언한 데이터는 app.component.html에서 바로바로 표현 할 수 있다 정도로만 이해하면 될 것 같다.
마지막으로 그렇다면 1가지 샘플을 더 봐보자. ts파일에 메소드1개를 추가한다.
import { Component } from '@angular/core';

@Component({
  selector: 'app-root',
  templateUrl: './app.component.html',
  styleUrls: ['./app.component.css']
})
export class AppComponent {

  title : string = 'study';
  public num : number = 10;
  public all : any = new Array();

  public printAll(arg){
    console.log(arg);
  }

  private print(arg){
    console.log(arg);
  }

  constructor() {
    var text : string = 'plain text';
    this.print(text);
    this.printAll(text);

    console.log(this.title, this.num, this.all);
  }

  private ifIwereGoToServer() : void{
    //어떤 특정 데이터를 주는 서버에 갔다왔다고 하자.
    this.all.push('Result');
    this.all.push(12345);
    this.all.push(23456);
    this.all.push(78923);
  }

  private changeTitle(){  //새로 추가한 메소드
    this.title = '바꾼다..title';
  }
}
이어서 html파일에도 기능을 추가하자.
<div>{{ title }}</div>
<div>{{ num }}</div>
<input type='button' value='서버에 갔다왔다' (click)='ifIwereGoToServer()'/>
<br><br>
<div *ngIf="all.length > 0">
  <div *ngFor="let item of all">서버에 갔다왔다고 한 데이터 : {{item}}</div>
</div>

<br><br>
<input type='button' value='바뀌어라 타이틀' (click)='changeTitle()'/>
예상한데로 새로 등록한 버튼을 누르면 화면의 title로 선언한 변수값이 변경이 된다.
앵귤러의 코딩방식은 위의 방식데로 이루어 지는 것이 거의 전부라 할 수 있다.
어떠한 ts파일에서 각종 데이터에 대한 행동을 정의하고,
html 파일에서는 ngIf, ngFor 같은 기호들을 통해서 데이터를 표출하는 것이다.
그렇다면 아래처럼 정리가 가능하다.
1. ts로 불리는 파일은 Javascript에서의 <script></script> 역할을 한다.
2. ts로 불리는 파일은 각종 데이터, 변수 및 함수를 보관하고 있다.
3. 화면을 구성하는 것은 html파일로 이루어진다.
4. 특수한 기호를 활용하면 ts파일에서 정의한 내용을 가져올 수 있다. -> 예: {{blabla}}, ngFor, NgIf...
다음시간에는 ngFor, ngIf 같은 녀석이 뭐하는 녀석인지와 app.component.ts와 app.component.html 관계에 대해서 조금 더 깊게 알아보자.
'앵귤러, 리엑트, 뷰 > Angular Tutorial(old)' 카테고리의 다른 글
| 앵귤러 튜토리얼 (Angular tutorial) - 6 (0) | 2019.05.28 |
|---|---|
| 앵귤러 튜토리얼 (Angular tutorial) - 5 (5) | 2019.05.28 |
| 앵귤러 튜토리얼 (Angular tutorial) - 4 (4) | 2019.05.27 |
| 앵귤러 튜토리얼 (Angular tutorial) - 2 (0) | 2019.05.21 |
| 앵귤러 튜토리얼 (Angular tutorial) - 1 (0) | 2019.05.21 |


댓글